

December 31, 2015 – 28 months later

In the last update of this article I wrote that “the car is almost ready”: indeed that “almost” was heavier than I could ever thought. Actually I’m not surprised at all about the follow up activities of a restoration job, but this is a complex car, more complex than every other car I put my hands on so I didn’t imagine how many details needed to be fixed. The antenna for instance is an electric-operated unit: so far nothing strange but as a nerd I wanted to install the correct one which is the same installed on the BMW CS series of the same period: I needed one month to find a correct one but at last I worked it out. Then it has been the turn of the air conditioning compressor: it was working good but after a couple of test it began to leak: to remove it we needed to uninstall the water cooler and many ancillaries just to find out that it was gone: anther month to find another correct replacement.


Then the instruments: I send them to a known specialist to make them overhauled. When he gave them back to me of course I didn’t do a double check as the car was still not ready but, unfortunately, when I drove the car for the first time many of them didn’t work correctly.
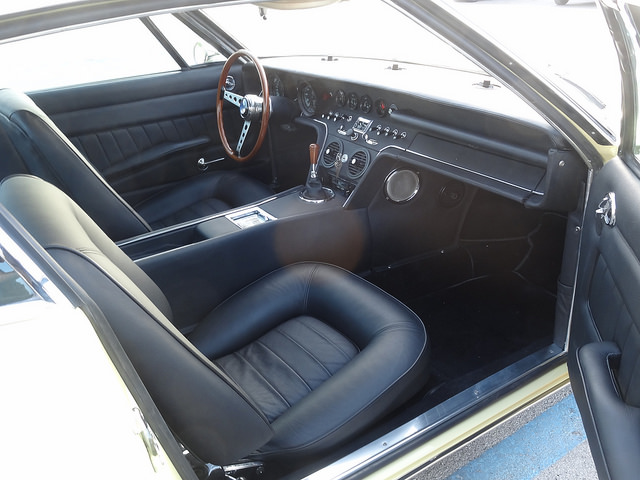
I ship them back to have a check again and they told me they had fixed them: once installed them again they were still not working, so I decided to ship them to Franco Rodighero, Italy, which is a true professional and skilled guy: he fixed them and now they’r working. Now the car still need a fine tuning (making four double-throat carburetors work together perfectly is not an easy job, even for a skilled professional) but it basically runs very good, being inside the cockpit is like being seat in a special living room: the first thing you think of is that 50 years ago, when this car came out, it would seem to people no less than a spaceship: ok the steering wheel is quite heavy when you turn it to park the car and in the tight bends but, if you want, today you could also install an electric power steering which helps you a lot: I decided to leave the car as it came out from Ghia and I don’t regret it at all.


28 months is a lot of time for a restoration but, in this case, it would have been hard to do it quicker. Of course, you get the reward of such effort simply staring at the car when it is parked. Unfortunately no photo gives justice to the car seen in flesh: when you see one for real you’ll understand what I mean.
Wish you a great 2016 full of love, health and fun.
March 10, 2015
Many weeks have passed since the last update, a lot of work has been done but in this stage it’s all about details, so progresses are not so visible like before. However, the car is almost ready.

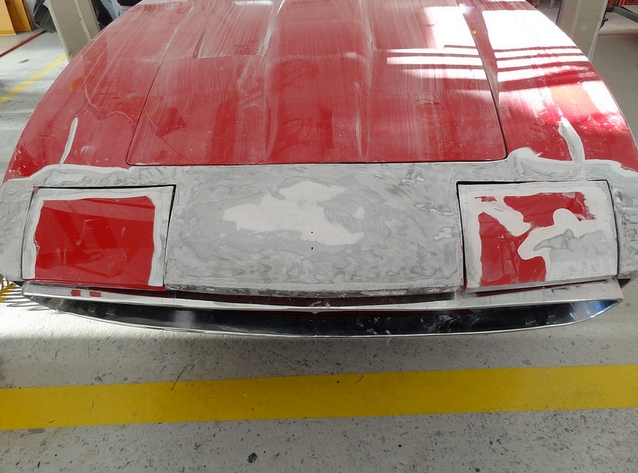
During the final assembly we realized that the front bumper was not perfectly centered with the nose of the car, so after having chromed it we had to do a cut-and paste job: cutting a newly chromed bumper was as painful as being stabbed.

As you can see, we didn’t have the headlights covers (made of plastic, a very expensive plastic!) so we bought them from Tralli, a Maserati specialist in Modena.

However, it’s a matter of pride seeing a car completely dismantled going back to its past glory, especially after so many attentions to details: as you can see, we were able to find the correct power antenna for the Ghibli: the same Voxon installed on period BMW’s E9.

Mag wheels have been restored and repainted with a Fiat silver paint: not too pale, not too dark, the correct shade. We were in dout about the tires to install: nothing is better than a Michelin XWX 205/70-15. The size is correct for a 4.7, the SS had the 215/70-15.

Interiors are ready after having been retrimmed with the correct Connolly p.a.c. (pressed and crushed) leather: they are just waiting to be installed. We hope to publish a full set of the finished car in the next update. More to come.
October 7, 2014
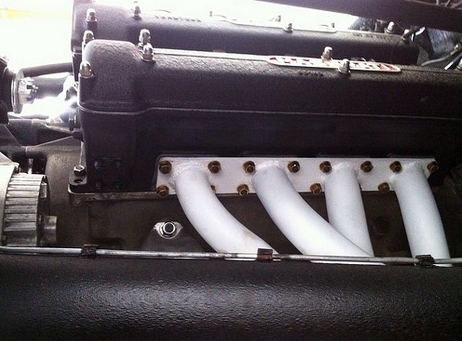
Finally the monster has been installed in his home: this was the easier part of the job as now there are hundreds of pipes, hoses and wires to connect.
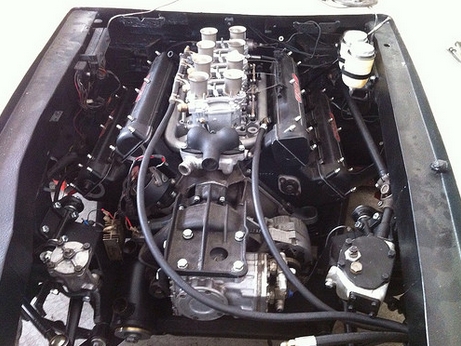
The best way to do the job has been to slip the engine into the engine bay along with the exhaust mainfolds: these have been treated with a white an high-temperature proof paint. It could sound odd but when the car was bought the mainfolds were yet painted in white: the car was pretty original (excluding the body paint) so we had no reason to think that such mainfolds treatment was not original.
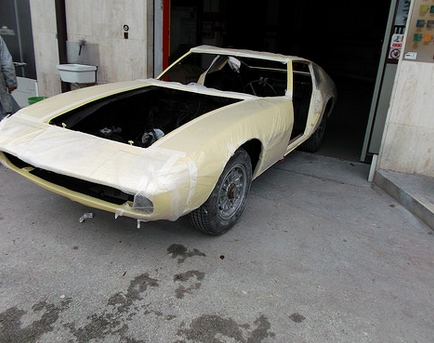
Of course, before doing alll these things the car, already painted, had to be protected from dings made by tools or whatever it goes around the shop: wrapping the body with a layer of airball is enough to ensure a good shield for the Avorio Santa Anita paint. More to come.
July 19, 2014

Finally also the gearbox has been put back toghether (not an easy task) and mated with the engine which has been finished a couple of months ago. A guy passing from the shop asked if he could buy the whole assembly, just to put it in his living room!

The exhaust is ready. A beautiful craftsmanship made by two former employed at ANSA who, some years ago, took over all the original drawing and castings from ANSA (when it closed its doors) to reproduce exhaust systems with the original specifications. For info this is their website.


Now the mechanic is reassembling the front end and the brakes. It is a challenging task are there are hundreds of hoses, nuts, bolts and washers (all original and cad plated) to put in the correct place. However, the job is almost complete and, after that, it will be the time to put back the heart into the engine bay. More to come.
May 4, 2014
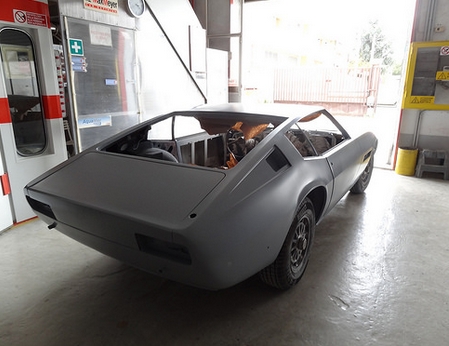

Two months have passed since the last update and a lot of job has been done. Now all gaps are perfect and the whole body is laserproof straight and clean. Basically the “metal” job has ended and now, after have been painted with an epoxy primer, the car is waiting for the final touches, before reinstalling the engine/gearbox assembly and to rebuild and paint the suspensions (and, of course, the whole car)


Interiors have been delivered today by the craftsman who has redone them using the correct Connolly P.A.C. (Pressed And Crushed) leather; must say that the outcome is beautiful: the seats looks properly sculpted and all the stitchings are perfect. He has also cleaned the chrome trims which were yet in nice conditions. More to come…
March 2, 2014

Finally the twin-headed monster has been reassembled with the exception of the air conditioning compressor, which has been equipped with new hoses and joints. As it can be seen, the block is very short: the heads are the real protagonists of this unit. In the end, reassembling the engine has been the funniest part of the job.

Even when you see an perfect-looking but unrestored, 40 years old (or older) car, never believe to the word “rustless”: rust, even if in few places, must be there on all these cars which bodies have never been corrosion-treated when built. On this particular car the corroded metal was in the usual places, but that doesn’t mean that it’s an easy job to fix them. This particular car was basically “rust free” and we can roughly estimate circa 300 work hours to fix it. More to come….
February 2, 2014

The clutch has been rebuilt providing it with a modification which should lighten the effort on the pedal (don’t ask me how): it is a Borg & Beck double disc unit which – smile please -was installed also on a period tractor, the Om-Fiat 615.

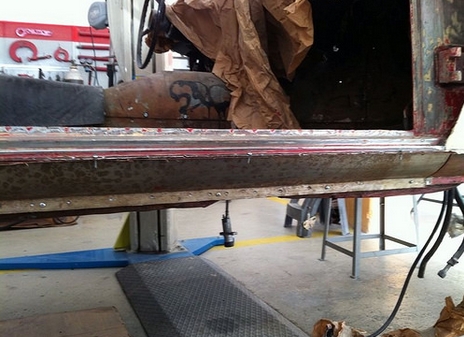
The metal work still foes on: we found the typical rust under the sills and on the lower side of the doors: this is a typical issue on a 40 years old cars and I’m not worried at all. The front end had a crash in the past (on the driver side) but it has been completely fixed: all the gaps have been checked and they’re very good now.

However, the rest of the metal is in very good shape: the car has been progressively brought to bare metal on the outside but for few hours: we wanted to avoid oxidation so some base coat has been sprayed on it. More to come.
January 5, 2014
Finally the carburetors pack has been rebuilt. It was not an easy job but the outcome is very nice.
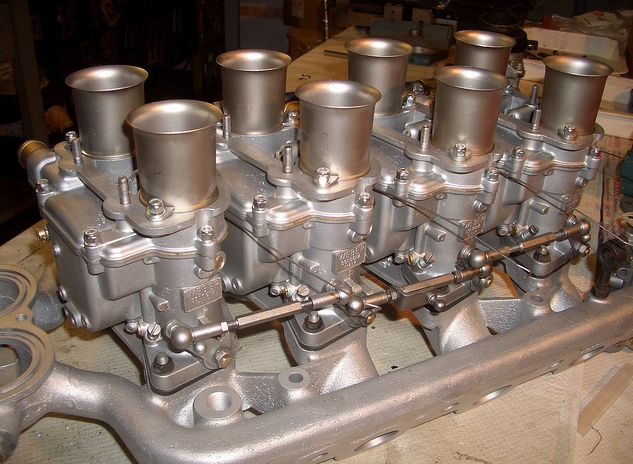
Indeed a couple of carburetors were seriously damaged as probably, sometimes in the past, some water stagnated inside there (it’s a mistery for us about how it could be possible), producing a lot of oxidation on the brass jets and not only.

Actually also the bodies of the two carburetors have been damaged somehow, luckily the damage was only superficial.

Stay tuned for more.
December 7, 2013
The heads have been redone, replacing seals, doing the proper grinding on valves an cleaning everything, without being too aggressive.

The heads have also been cleaned and resprayed with the wrinkle paint, which need to be put in the oven to look like this. An expensive paint but definitely whorthy of the effort.

These are not a new pieces of Lego® but new caliper pistons made from scratch with a CNC lathe: they could also be found on the market but they will be never as good as these which, btw, are made of stainless steel. More to come…

November 23, 2013
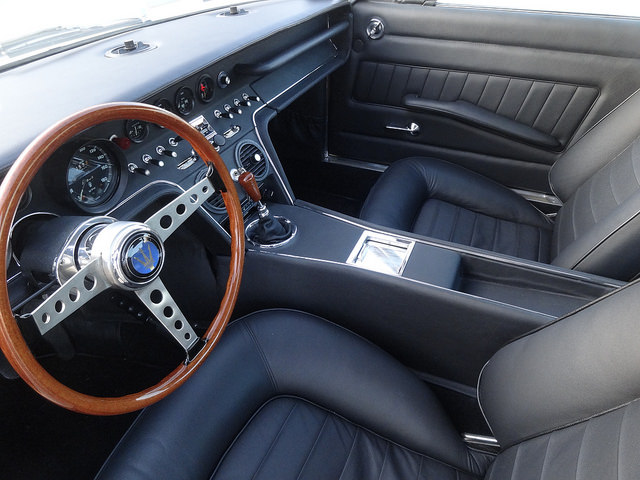
In the meantime, there is not only the metal to fix. Many parts need to be refreshed like the steering wheel. Although it was not cracked the wood ring has become dry and dull, so we sent it to a company which is capable to make your old steering wheel look like new.

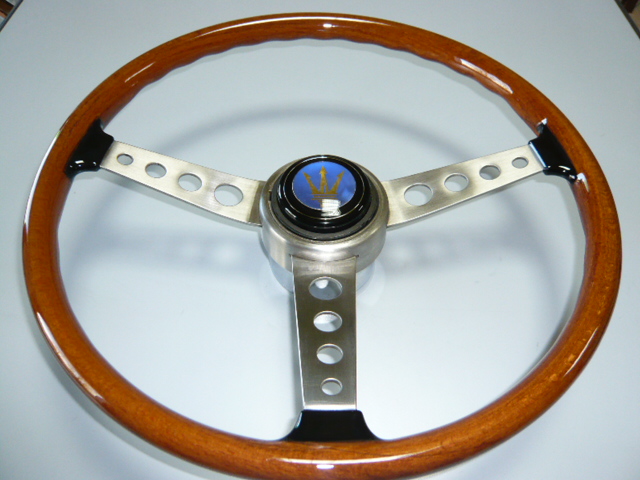
We were tempted to polish the spokes but finally we decided to make it more period correct: the metal is simply brushed. Along with the steerung wheel we told them to make a new gearshift knob with the same wood/tratment of the steering wheel, so both colors match:

Actually this knob is missing a couple of slots on the top: we will tell them to complete the job. More to come…
November 9, 2013
“So take a look at me now, oh there’s just an empty space” (P. Collins)

As I wrote last week, the car had a crash near the driver fender which had been roughly filled with bondo: once scraped to bare metal it was rustless but completely wavy: the best thing is to cut it and to replace the part with new steel.

With the proper creftsmanship, the Ghibli has now a nice face: all the gaps around the bumper have been adjusted and now it looks great. Now the eyebrows are perfectly aligned with the middle front area.
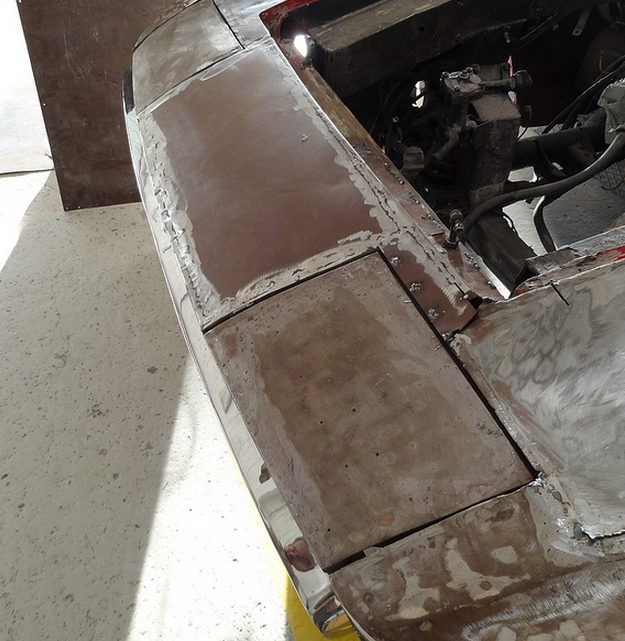
Nice work, isn’t it? More to come…
November 2, 2013


The hard work is yet started. The shell is in great conditions, the rust is limited to very few spots near the lower front wheelarches. Someone in the past had the idea to cover the whole undercarriage with a thick layer of insulant: ugly to see but, at last, very effective.


The front end was slightly damaged and poorly repaired in the past. Time for new steel.
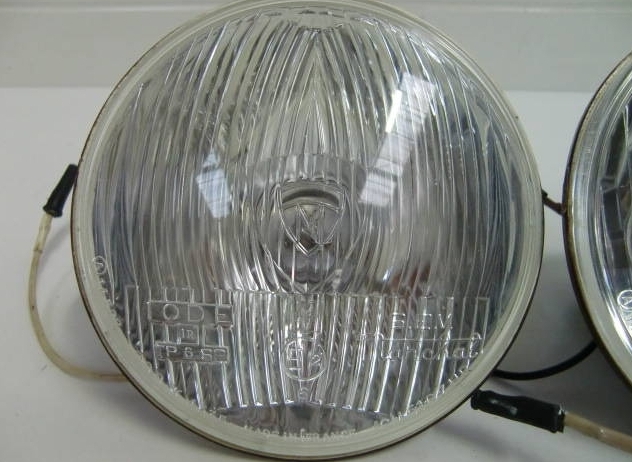
This car is equipped with Marchal headlights: one of them (main beam, code TP6SP) was broken so I must find one. They’re quite rare so I found one in Belgium for $100: it’s almost new. More to come…
October 19, 2013
The surgery is started from the face:
Wow, that’s what I call “a fine job”:

If you need some concrete for your next new home basement just ask.

In the past the car had a little crash on the front, probably a rear-ending. So, the easiest way to align headlights eyebrows and front edge? 100 pounds of plaster.

Usual rust in usual place for a 46 years old car. Not so worrisome: business as usual. More to come…
September 21, 2013

August is a lazy month so few has been done since. However, some other things have been disassembled: the whole carburetors pack has been removed along with the air/liquid mainfold which is a single piece. It will be sent to a specialist to be rebuilt/overhauled. Don’t you think that it will be nice as a centerpiece in your living room?
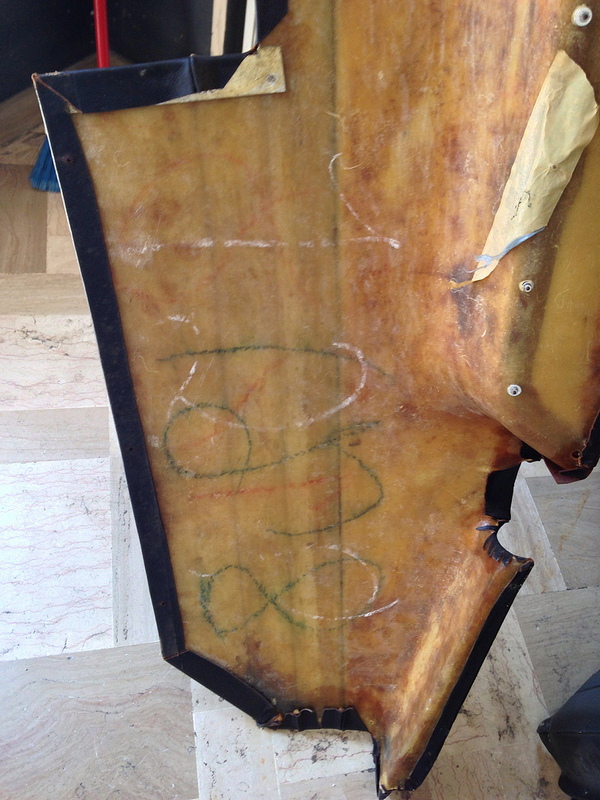
Also the interior panels have been removed. They are in extremely good shape so the leather will remain the original one. As you can see, behind the panels there is the number 128 crayoned on the mold: full matching numbers indeed!

The whole engine is now in pieces: although I thought it would be difficult to find all the spare parts to rebuild it, I found that Maseratinet.com has all the necessary things. Just a couple of days and the spare parts have arrived: a top class service.

Last but not least, the heads and other bits inside the engine bay were originally covered with a black wrinkle paint, so I bought a special paint made just for engines: also the price is special: $200 for 2.1 pints (1 lt.). More to come…
July 28, 2013

The engine bay is now empty: the “beast” has been removed to be overhauled. After having removed it we saw that, although there are not serious rust issue, the whole bay and the undercarriage will need a good amount of work to bring back all the parts to their past glory.

The twin servo are in bad conditions and very probably they must be replaced: the master cylinders are not recoverable but we need to check if the main assembly could be salvageable.

Here is the V8: heads have been removed and we have checked them: no major issues with them but all the valve seals and guides will be replaced. Distribution chains are ok on this matching number engine.

Bearings are not so bad but neither so good: once we decided to open the engine we can’t make any expense spare on such important components which will be replaced with a set of new ones. Once rebuilt, this engine must purr like a kitten and turn as smooth as silk. More to come….
July 21, 2013
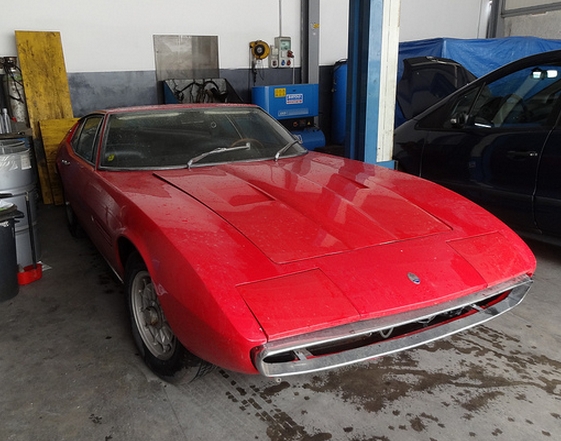
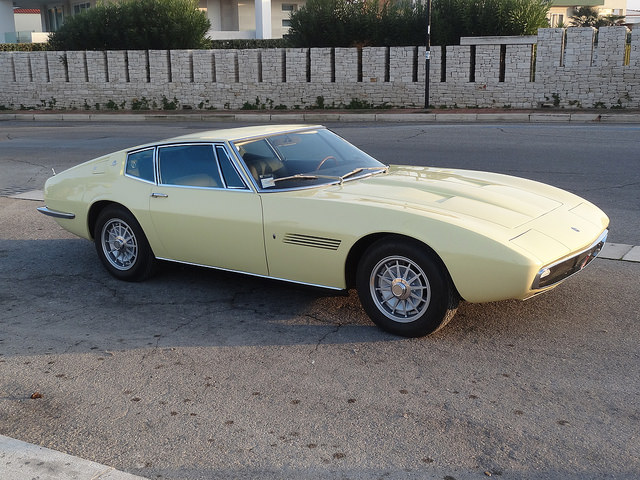
As many have not the chance to follow a restoration process, we decided to show how we do it. Obviously we put on the table the knowledge about the car but the hands are not ours but of some skilled professionals. The car is an early 1967 Maserati Ghibli Coupé which has only 33k miles on the clock: we believe they’re correct as the overall status of the car is good: especially the interiors are very, very good. This car was not originally painted in red: the original color is “Avorio Santa Anita”, a kind of Primerose Yellow. We’re not crazy about the original color so we’re wondering if painting it in the period correct “Celeste Chiaro”.


As it’s an early Ghibli, it has two calipers per disc on the front and Borrani cast rims with a set of 42 mm spinners. The car has also a clutch with two discs. This car was sold new in the U.S., it still holds the blue CA plate so it has been in California no earlier than 1972: we have no idea about the state where the car was sold new.

As we were saying, interiors are pretty good so all the leather will be cared and not replaced.

The engine will be removed and overhauled: if, after a check, the bearings will result good, only a job on the head and carburetors will be performed, along with the whole electricals and ancillaries. Same thing for the gearbox. The progress will be posted here so stay tuned for more.

Very nice to see your progress… I’m slowly scraping off 45 year old underseal off mine too and its in great shape underneath … a major surprise to me . Rust is in one sill and the spare wheel well so far and I think one front fender has filler hiding underneath a shiny coat of paint
LikeLike
The same for this car: few little spots here and there but basically the metal is in great shape. However, I suppose that the metal used for these cars was of better quality than the one used to build the average italian car of that period.
LikeLike
Any chance of an image showing the inside of the rear wheelarch taken from inside the car? The only rust I’ve found is at the inner flat back face at the rear of the wheelarch just inside the circular joint towards the bottom. There seems to be a double skin panel there but I haven’t stripped out the inside of the car yet to understand why it would corrode here
LikeLike
The only photo I have which could help you is this, so far: http://farm4.staticflickr.com/3696/10195864375_8c75778ed5_k.jpg
I’ll ask to make some detailed photos of that area.
LikeLike
Thanks, any help gratefully received!!
LikeLike
Hey Julian, check this out: http://www.flickr.com/photos/ugutsinda/sets/72157634395045391/
LikeLike
sensational, thanks
LikeLike
Fantastic job done on this car!
Is there any chance you’d have taken pictures of the headlights mounting system?
Are they Marchal parts??? Any help GREATLY appreciated!
Olivier (France)
LikeLike
Do you mean the eyebrows mounts or the electric motor?
LikeLike
Thanks for the answer regarding the headlights!
I am looking for some detailed pics of the chromed ring and the bucket! Are they Marchal parts as well?
Thanks again!
LikeLike
On very early cars like this they are Marchal. I’ll see if I find something.
LikeLike
Thanks again for your answers.
I don’t know if you have access to my email address, but it would be great, if you have some pictures to share to send them directly to my email.
I have been hunting some Marchal parts like the chromed ring and the funky bucket.
If you can help, I ould be VERY VERY glad. And if I can be of help in return, I would be happy to help! Living in France it is “easier” to source europeans parts.
Regards
Olivier.
LikeLike
That amazing! I hope we get video at the end of the engine starting and the sound of it
LikeLike
Hi again Virus; Lately I’ve seen your pictures of the finished product – it is one of the most STUNNING cars I’ve ever seen! The color, that Ghibli shape, those wheels, everything! Fantastic!
LikeLike
Hi Richard, thank you for these kind words. I appreciate them even more after all the effort spent into this hard and long restoration (which, by the way, is not finished yet).
LikeLike
I’m just finishing up a total restoration of a 1967 Ghibli which has had the top cut off. Black enamel paint. Should be up and running n a week. We had a custom windshield made in Australia but it is not in yet, that will be the last thing I do. Car has AC and power steering.
LikeLike
I’ve been working on this car since 1987. In that time it has only been driven about 30 miles. Total mileage on the odometer is less than 20,000 kilometers.
LikeLike
Since 1987? I was done with the restoration after two years only! Did you do all by yourself?
LikeLike
Classic, many people have worked on this car but I started it and now I’m finishing it. The owner has experienced every screwup and delay known to man, plus he has lots of other cars. I’m also restoring his 1970 Ferrari Daytona Spyder, which I rebuilt the engine of more than 25 years ago, he drove as a daily driver for 20+ years then it was in a single car accident about 5 years ago.
LikeLike
Hi CV,
beautiful restoration, well done!
Not sure if you still monitor these pages, but if you do a quick question.
When you removed the engine, and reinstalled, did you remove/reinstall the engine and gearbox at the same time as a single unit? Or did you do the engine first, followed by the gearbox separately, and reverse that order for the reinstall?
Much appreciated,
Mathew
LikeLike
Hi Mattew, thank you. As far as I recall, the mechanic uninstalled them separately (engine then gearbox) and installed then in the same order. That’s because the crane he had was not big and couldn’t stand the weight of both together.
LikeLike
Thanks for the reply, much appreciated.
LikeLike
You’re welcome!
LikeLike